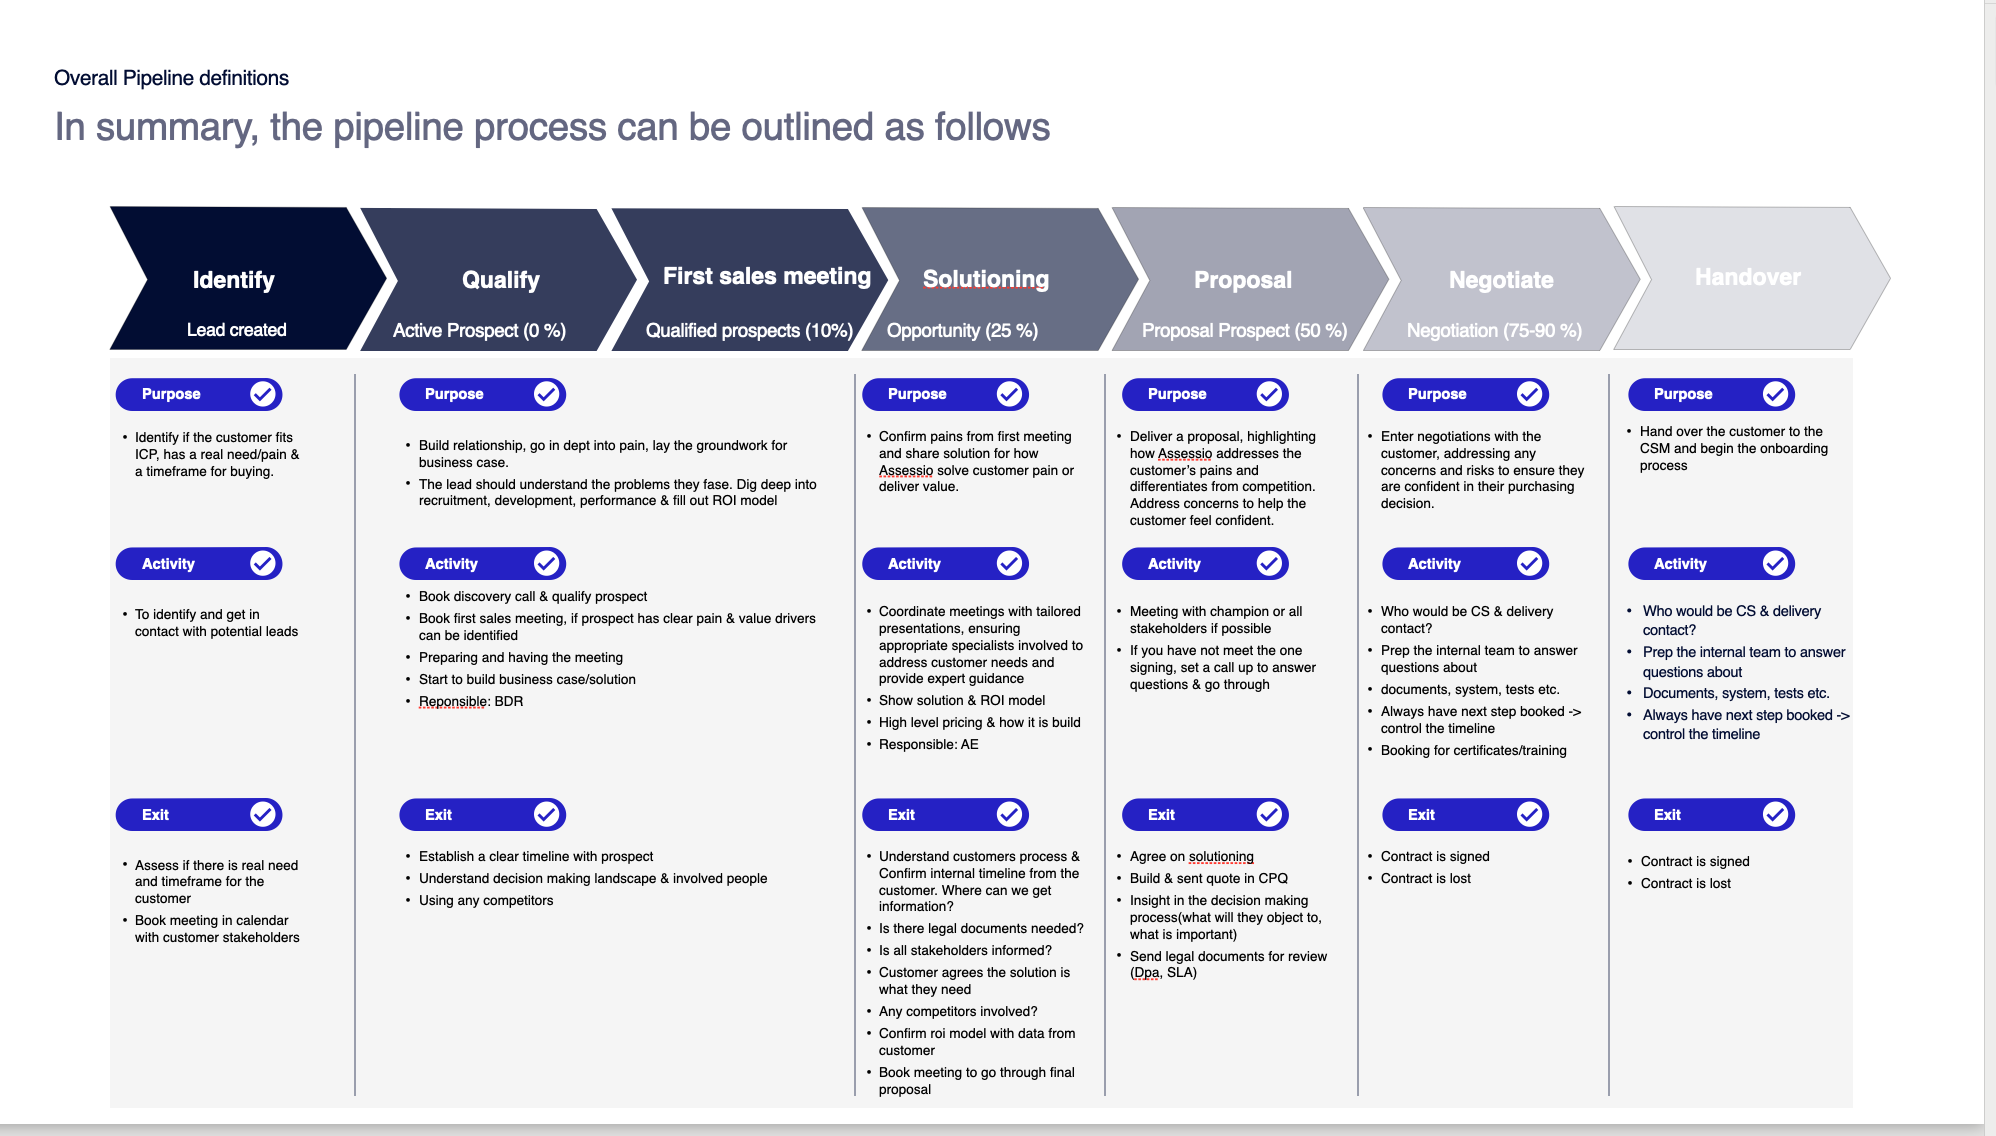
Important document for Sales and marketing, here all the logic sits:
Presentation: https://t31517146.p.clickup-attachments.com/t31517146/8dd1285d-781a-4244-994a-f98b7d9f7897/Assessio_key%20sales%20%26%20marketing%20document.pdf
See attached from last slide for definitions
.png?width=670&height=381&name=image%20(48).png)
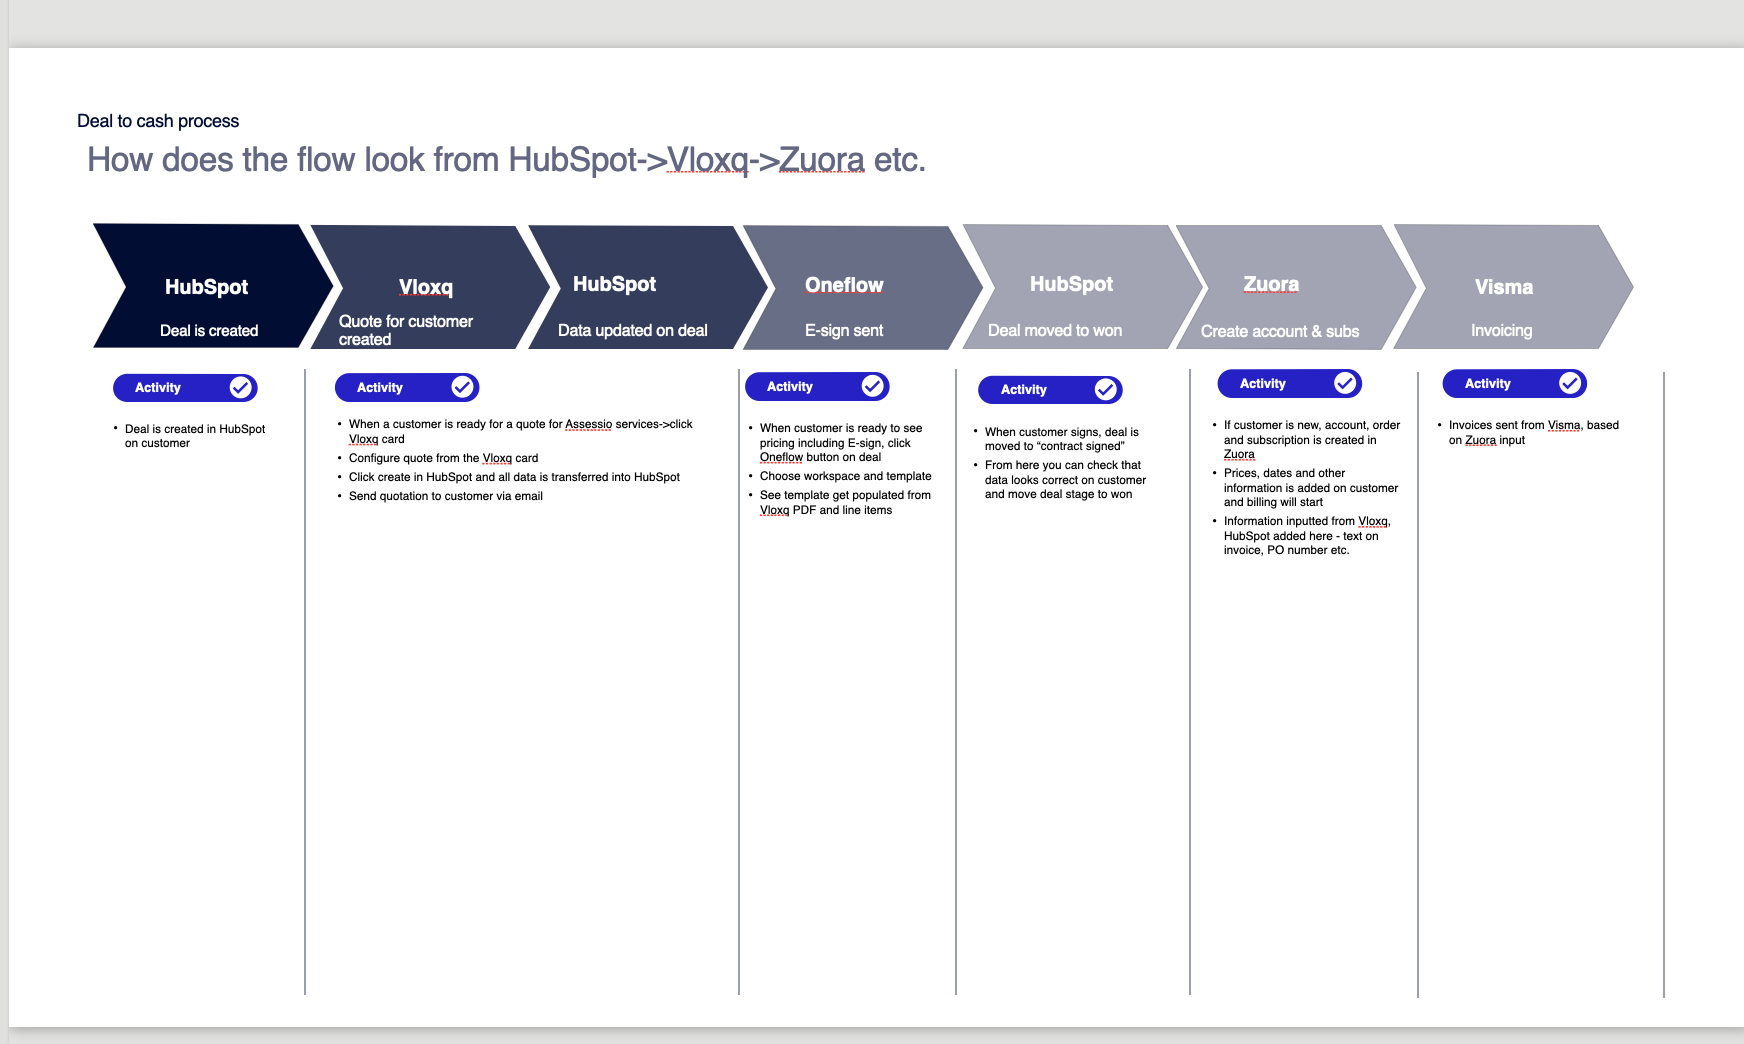
Full flow from HubSpot→Vlox→Zuora

.png?width=670&height=401&name=image%20(38).png)
Overall quote to cash flow:
HubSpot - general introduction

HubSpot - intro for sales
https://share.vidyard.com/watch/eXzjjcWNzpdAAHM12VGoj2
CRM basics
Contacts & companies
https://share.vidyard.com/watch/hns8WC3AkWnQtBUBteUTFf?
Deals & Pipeline

Find contacts & companies
.png?width=640&height=360&name=image%20(50).png)
Assessio - find contact/company and create contact, company & deal
How to restore a record, if you deleted it?
First go to the company section here
second you click here
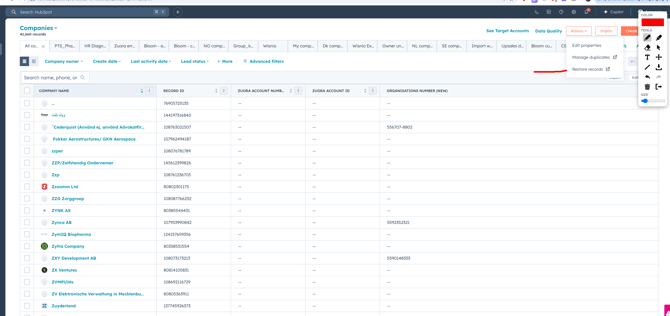
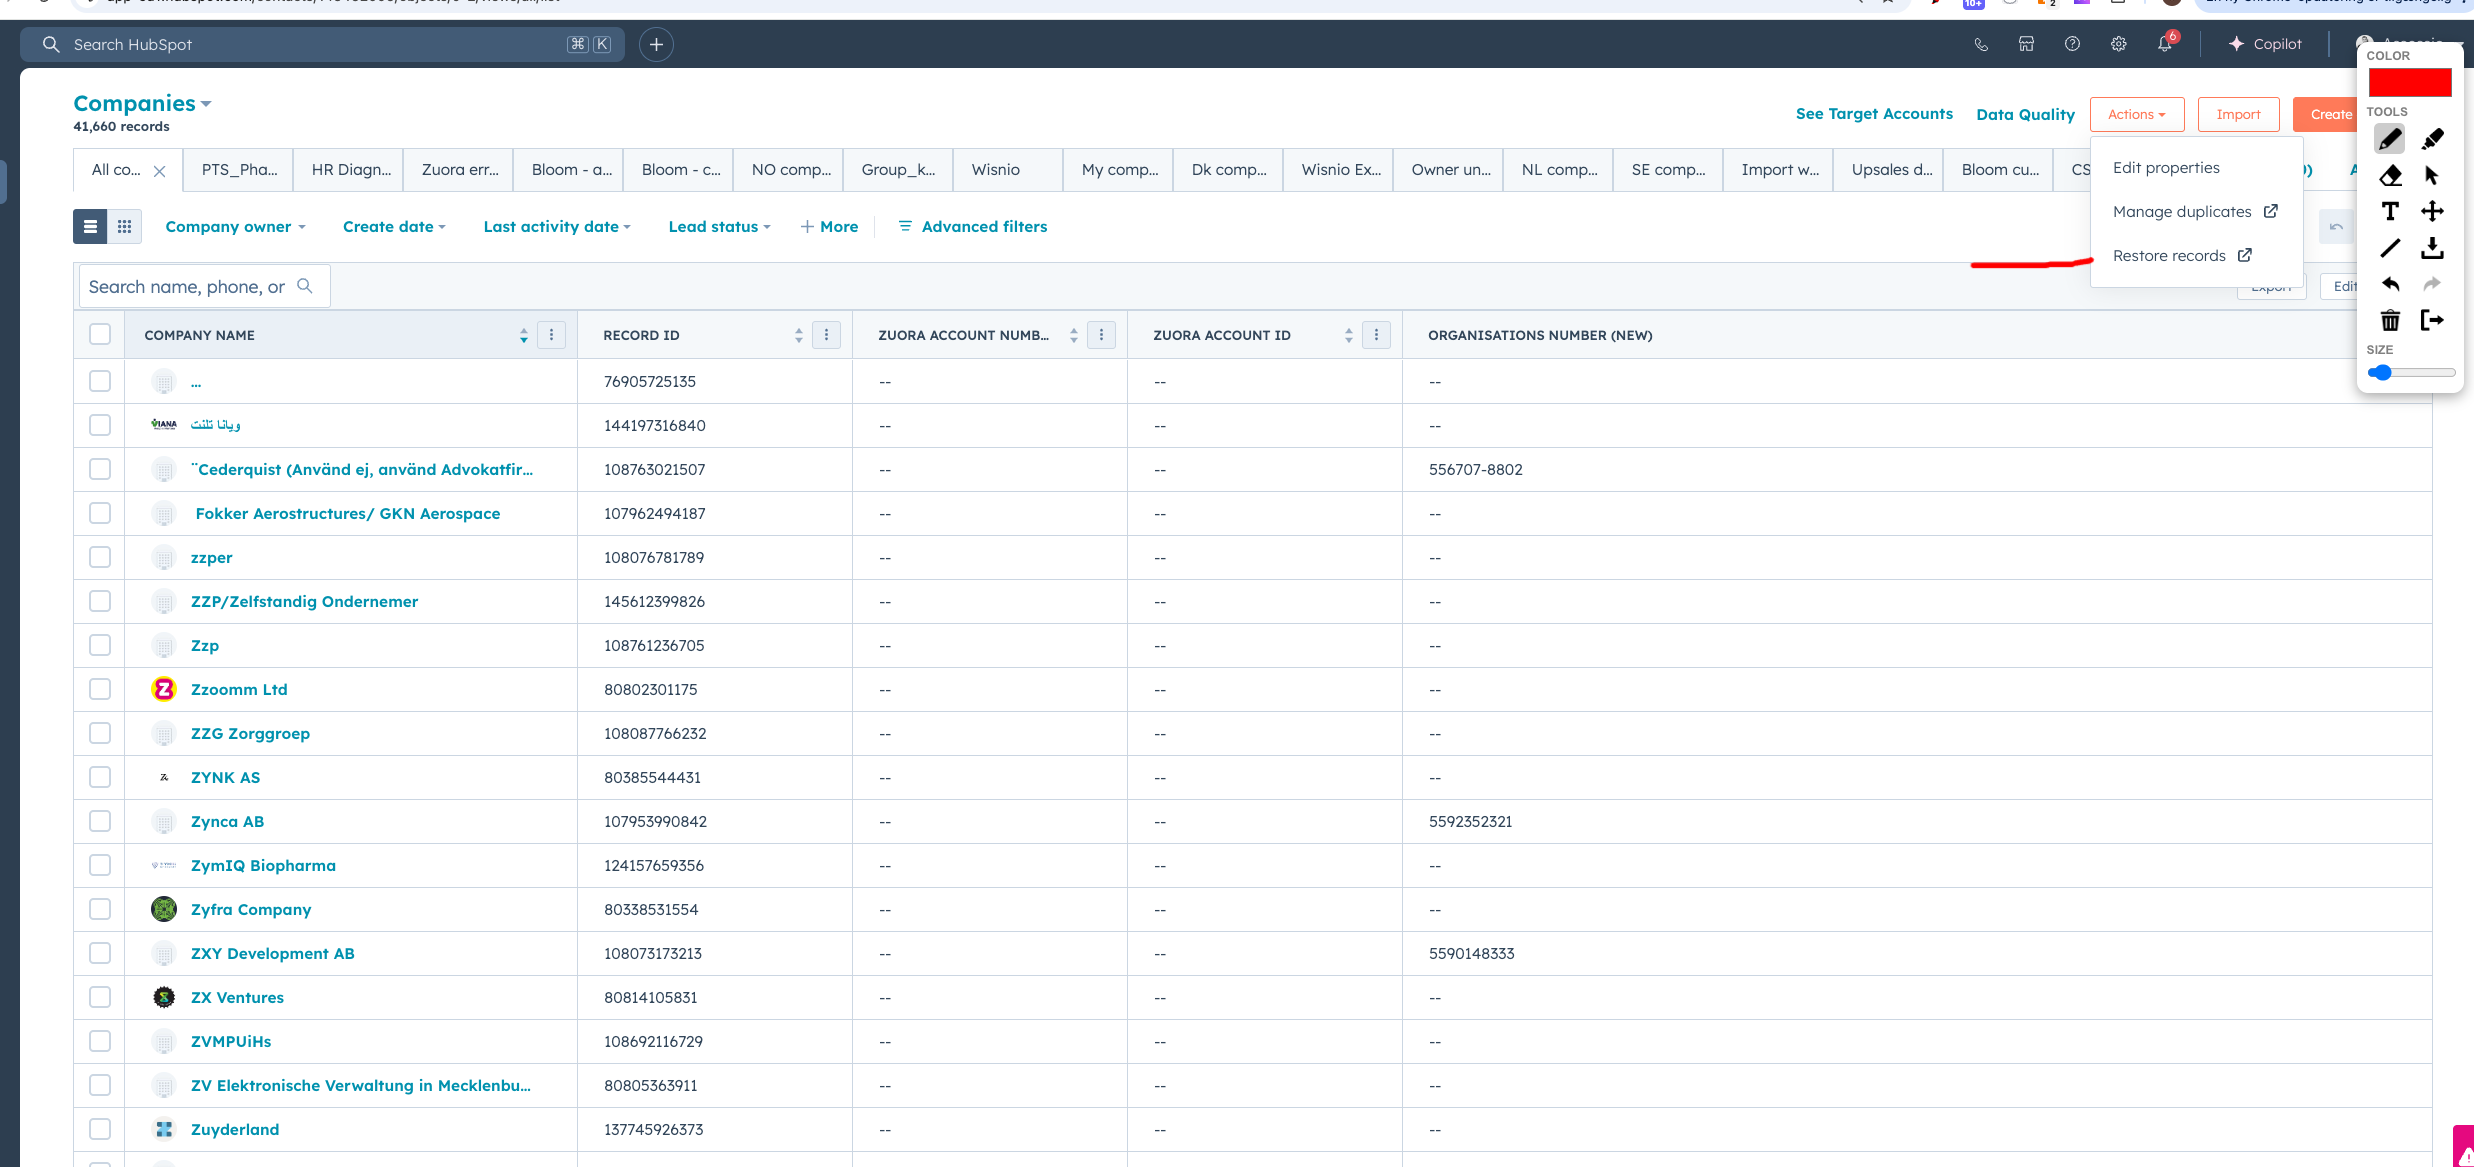
And then you see overview of deleted records
Then you search for the record
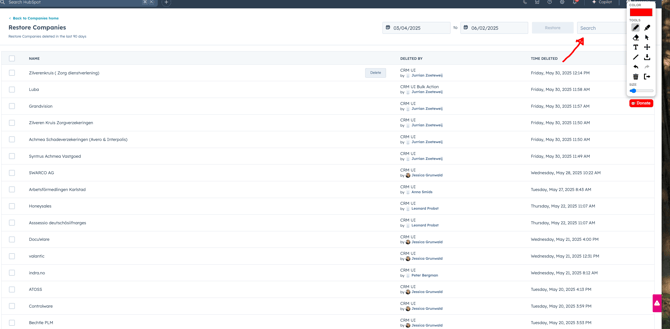
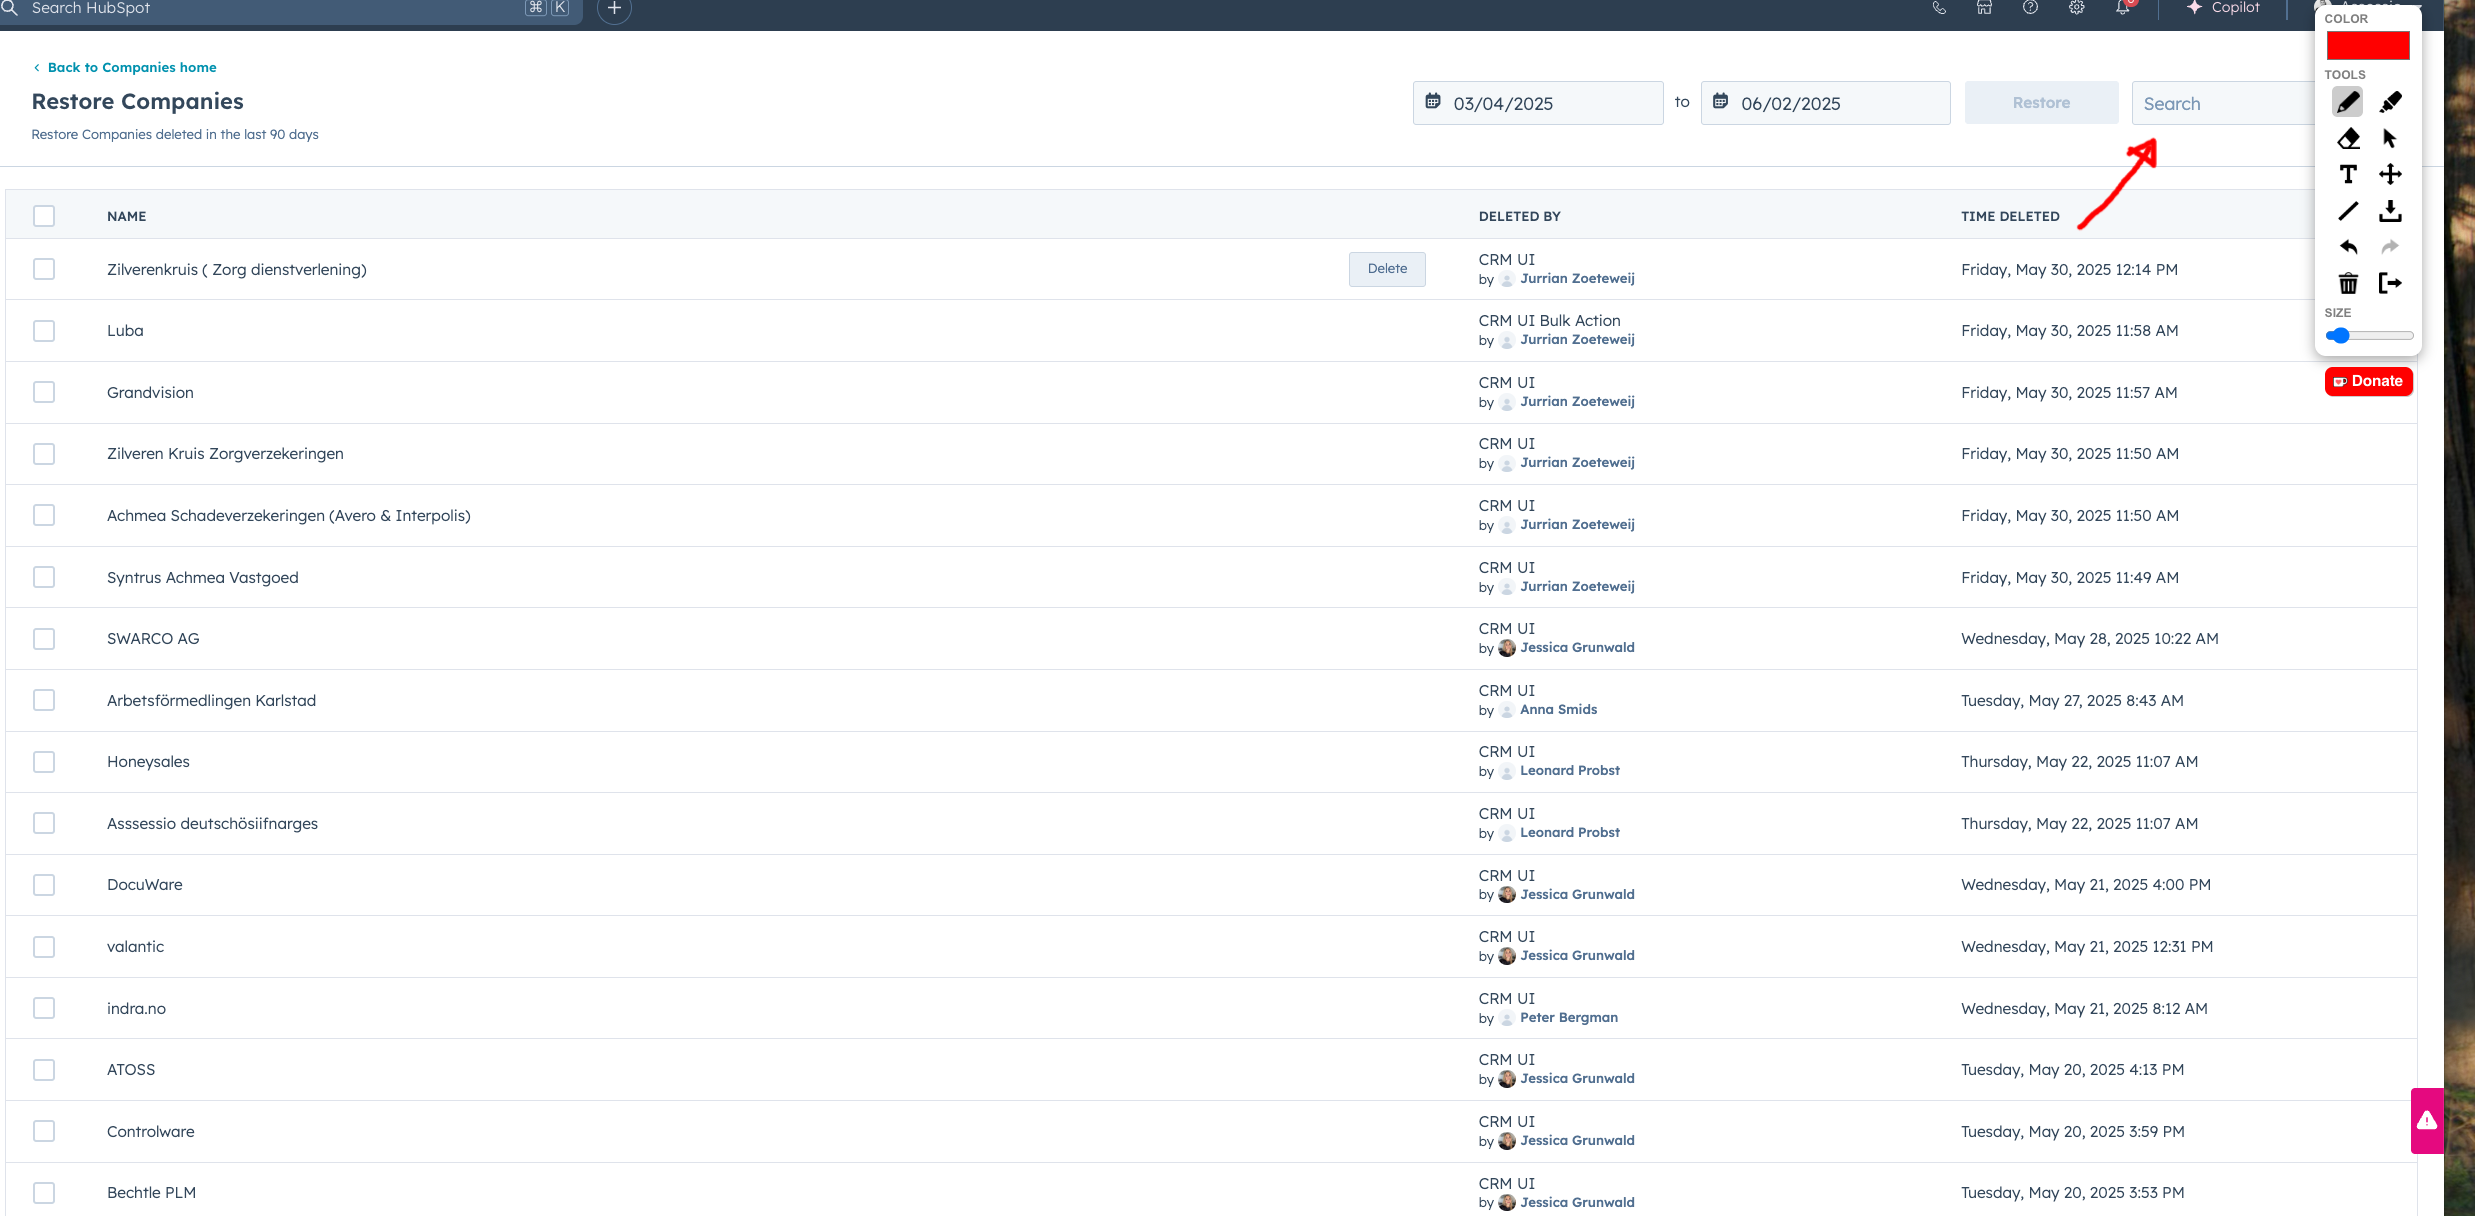
Then hover your mouse over and click restore
Get started & setup user
Email, meeting integration & calling integration
Connecting Your Microsoft Email to HubSpot
1. Why Connect Your Microsoft Email?
By connecting Outlook/Office 365 to HubSpot, you can:
-
Send emails directly from HubSpot CRM.
-
Automatically log email activity on contact, company, and deal records.
-
Use templates, sequences, and tracking.
-
Sync your inbox across HubSpot and Outlook.
2. Prerequisites
-
A Microsoft 365 or Outlook.com account.
-
Permission from your IT admin (if you’re on a company-managed domain).
-
HubSpot Sales Hub free or above.
3. Connect Your Microsoft Email
-
In HubSpot, click your profile picture (top right) → Profile & Preferences.
-
In the left sidebar, go to General → Email.
-
Click Connect personal email.
-
Select Office 365 (for work/school Outlook) or Exchange/IMAP (for custom setups).
-
Log in with your Microsoft credentials.
-
Grant HubSpot the requested permissions (read, send, sync emails).
4. Confirm Connection
-
Once connected, your Outlook/Office 365 inbox will appear under Connected Inboxes.
-
You can now send emails directly from HubSpot, and all emails will log automatically in the CRM.
5. Optional: Install the HubSpot Sales Add-In for Outlook
If you also want to send tracked/logged emails directly from Outlook desktop or web app:
-
Open Outlook.
-
Go to Get Add-ins / Store.
-
Search for HubSpot Sales.
-
Install the add-in and log in with your HubSpot account.
👉 This adds HubSpot tools (templates, sequences, logging, tracking) inside Outlook.
6. Troubleshooting Tips
-
If your inbox doesn’t connect, confirm with your IT team that HubSpot is allowed as an app.
-
For desktop Outlook, make sure you install the HubSpot Sales Add-in.
-
If sync breaks, disconnect and reconnect your email from Settings → General → Email
-
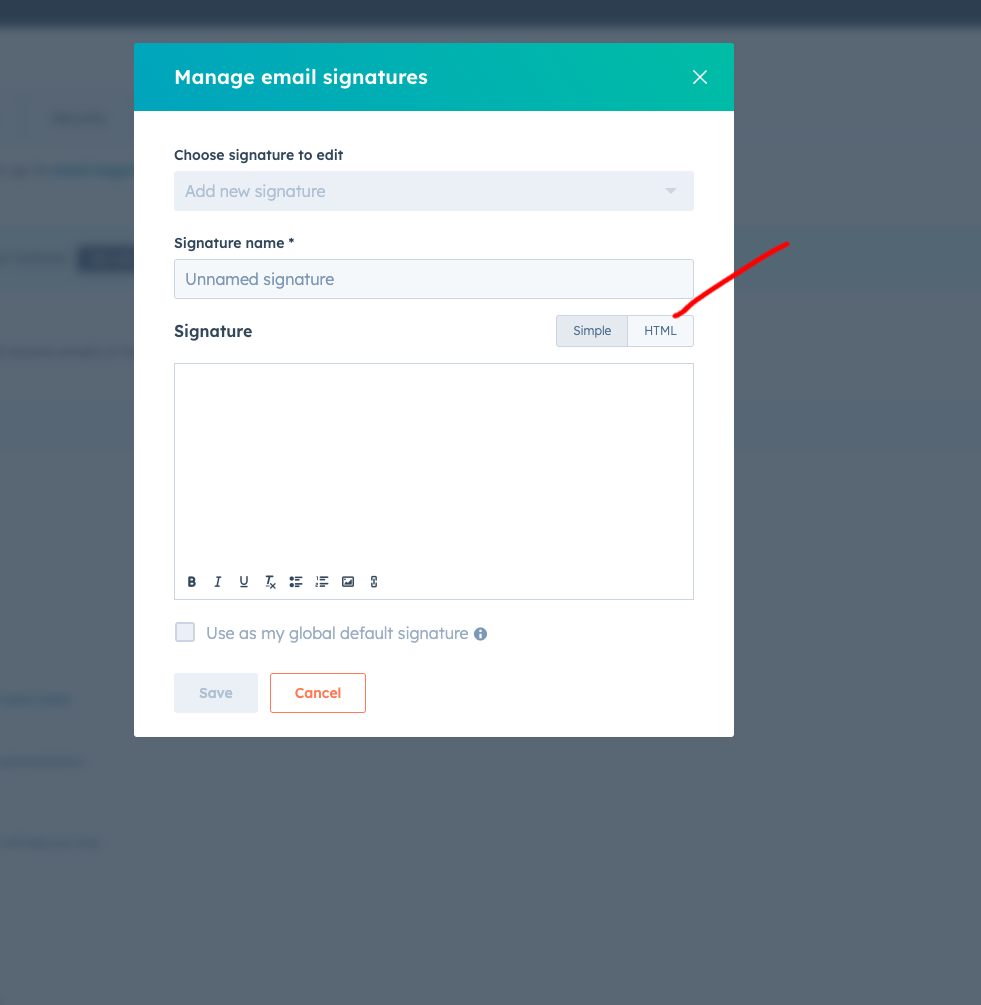
How to setup email signature in HubSpot
-
Go into this HTML generator:
AssessioSignatur Generator
-
Copy the HTML code in the bottom
-
Insert here into your email signature: https://app-eu1.hubspot.com/settings/145462006/user-preferences/email
-
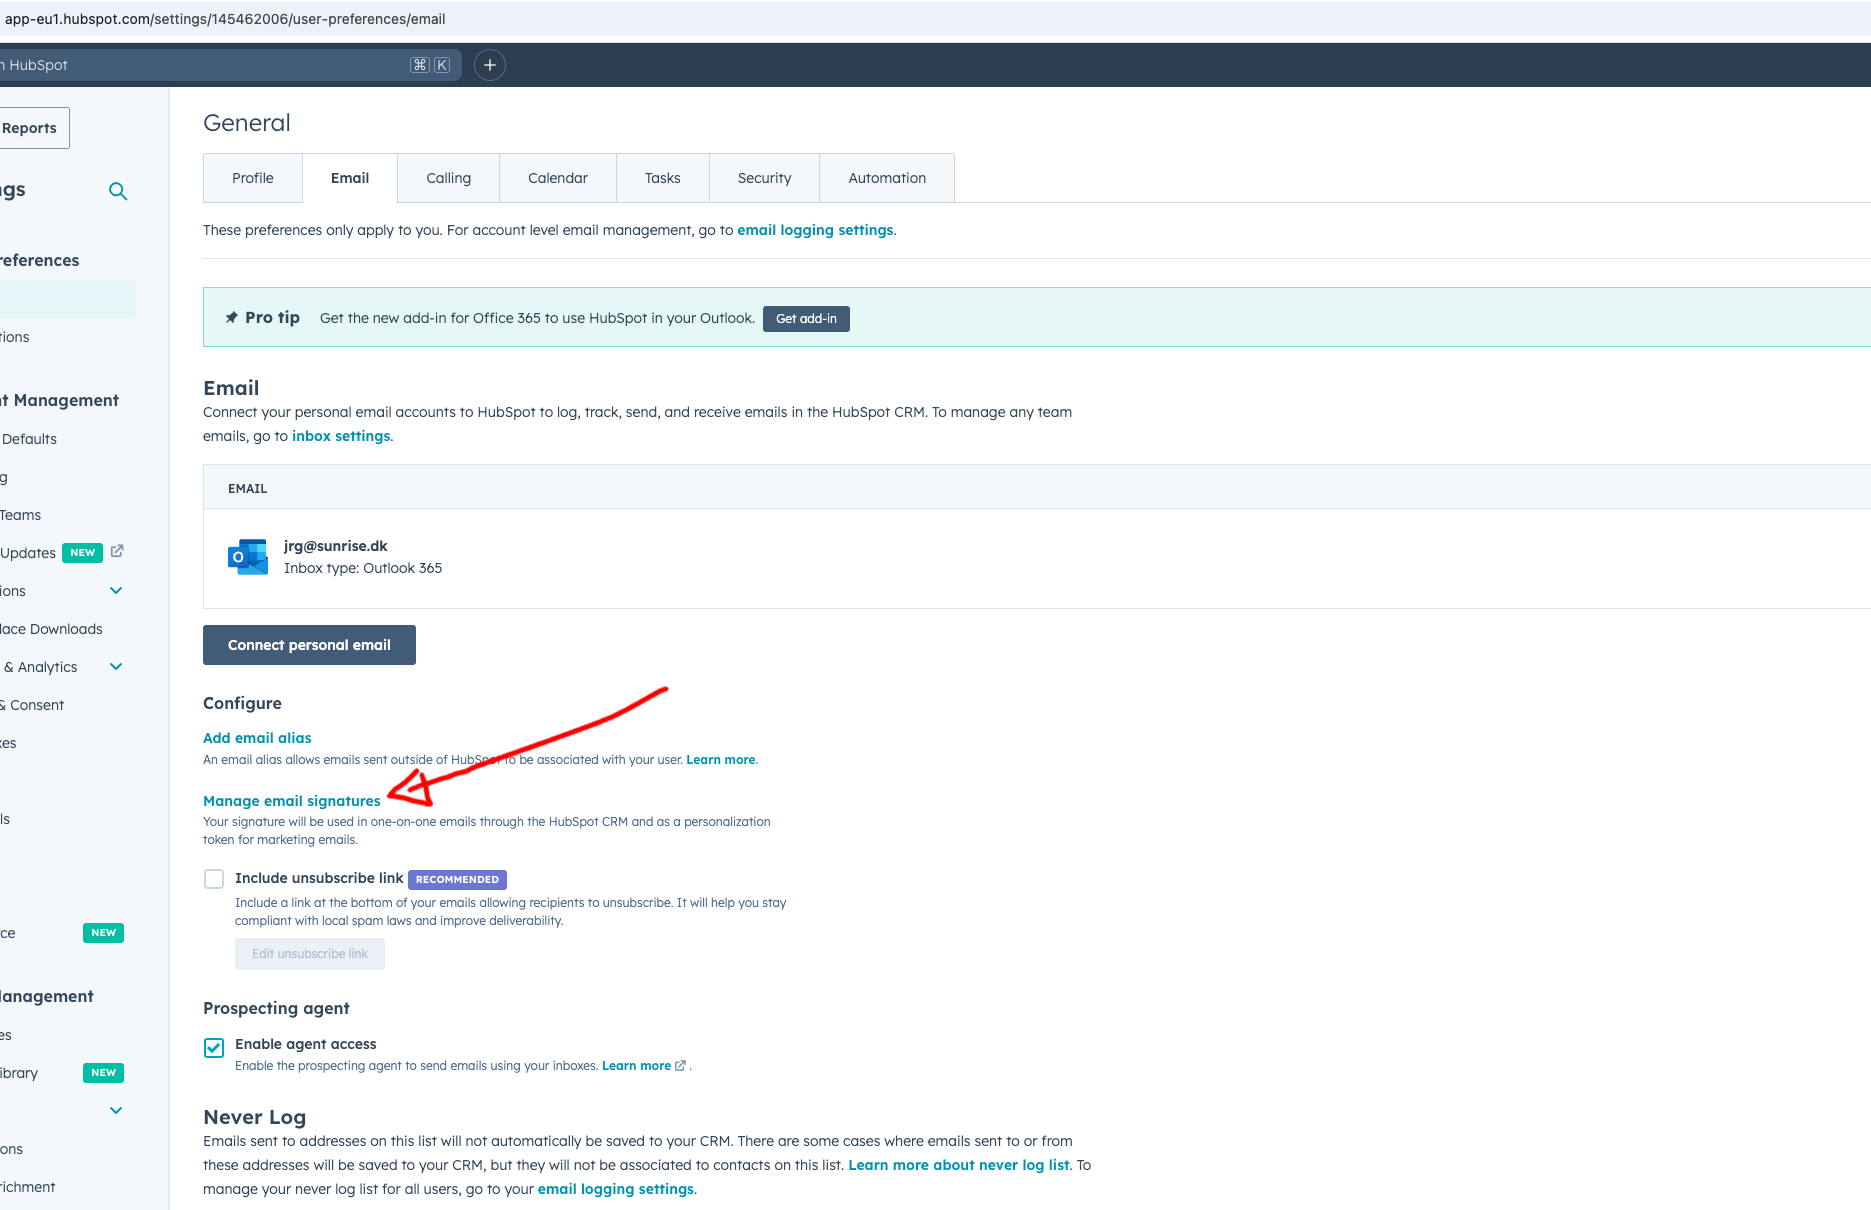
-
Click the HTML icon and insert code
.png?width=670&height=686&name=image%20(51).png)
Connecting Your Calendar to HubSpot
1. Why Connect Your Calendar?
Connecting your calendar allows you to:
-
Share a HubSpot meetings link with prospects.
-
Automatically log meetings in HubSpot.
-
Avoid double bookings with real-time calendar sync.
2. Supported Calendars
HubSpot supports:
-
Google Calendar
-
Office 365 Calendar
-
Outlook Desktop Calendar (Windows)
3. Connect Your Calendar
-
In HubSpot, click your profile picture (top right) → Profile & Preferences.
-
In the left sidebar, go to General → Calendar.
-
Click Connect Calendar.
-
Choose your calendar provider (Google, Office 365, or Outlook for Windows).
-
Log in and grant HubSpot permission to access your calendar.
4. Confirm Connection
-
Once connected, you’ll see your calendar account under Connected Calendars.
-
Test by creating a HubSpot meeting link (under Sales → Meetings) and ensuring availability matches your calendar.
5. Managing Settings
-
You can choose which calendar HubSpot uses for scheduling (if you have multiple).
-
HubSpot will block times already booked in your calendar so prospects can’t double-book.
-
Meetings created in HubSpot will appear directly in your calendar.
6. Troubleshooting Tips
-
If events don’t sync, try disconnecting and reconnecting your calendar.
-
Make sure you grant HubSpot permission to manage events, contacts, and availability when connecting.
-
For Outlook desktop users, you may need to install the HubSpot Office 365 add-in.
Connecting Microsoft Teams to HubSpot
See video here Assessio - connect to teams
1. Why Connect Microsoft Teams?
By connecting Teams, you can:
-
Add Teams meeting links automatically to HubSpot meetings.
-
Schedule Teams calls directly from HubSpot records.
-
Track meeting activity in HubSpot’s CRM timeline.
2. Prerequisites
-
You need a HubSpot account with Meetings access (Sales Hub Starter or above).
-
You need a Microsoft Teams account with permission to install apps.
-
Your IT admin may need to approve the HubSpot–Teams integration.
3. Install the Microsoft Teams Integration
-
In HubSpot, go to the App Marketplace.
-
Search for Microsoft Teams.
-
Click Install App.
-
Sign in with your Microsoft account and grant permissions.
4. Connect Teams to HubSpot Meetings
-
Go to Sales → Meetings in HubSpot.
-
Create or edit a meeting link.
-
Under Location, select Microsoft Teams.
-
Save your meeting link.
👉 Now, whenever someone books a meeting with you, HubSpot will automatically generate a Teams meeting link.
Connect calling/phone
Assessio - call through HubSpot
Why Connect Your Phone?
Connecting your phone allows you to:
-
Make calls directly from HubSpot contact, company, or deal records.
-
Automatically log call details in the CRM.
-
Record calls (depending on your region and subscription).
2. Options for Connecting Your Phone
🔹 Option 1: Use HubSpot’s Built-in Calling
-
In HubSpot, click your profile picture (top right) → Profile & Preferences.
-
In the left sidebar, go to General → Calling.
-
Click Connect Calling.
-
Enter your phone number.
-
Choose your calling method:
-
Browser calling → Make calls directly from HubSpot using your computer.
-
Phone calling → HubSpot will call your phone first, then connect you to the prospect.
-
🔹 Option 2: Use a Connected Calling Provider (VoIP)
HubSpot integrates with several phone providers (e.g., Aircall, RingCentral, JustCall).
-
Go to the HubSpot App Marketplace.
-
Search for your calling provider.
-
Install the integration and sign in.
-
Once connected, you’ll see the option to make calls from HubSpot via your VoIP provider.
3. Making a Call in HubSpot
-
Open a Contact record.
-
Click the Call button (phone icon at the top).
-
Choose your phone number or calling provider.
-
Dial the contact and start the call.
4. Logging and Recording Calls
-
HubSpot automatically logs the call in the contact’s timeline.
-
You can add notes, call outcome, and follow-up tasks.
-
With a supported subscription, you can also enable call recording (make sure this complies with local laws).
5. Troubleshooting
-
If calls don’t connect, double-check your phone number under Calling Settings.
-
Browser calling requires microphone access — make sure your browser allows it.
-
If using a VoIP integration, confirm your provider account is active and synced.
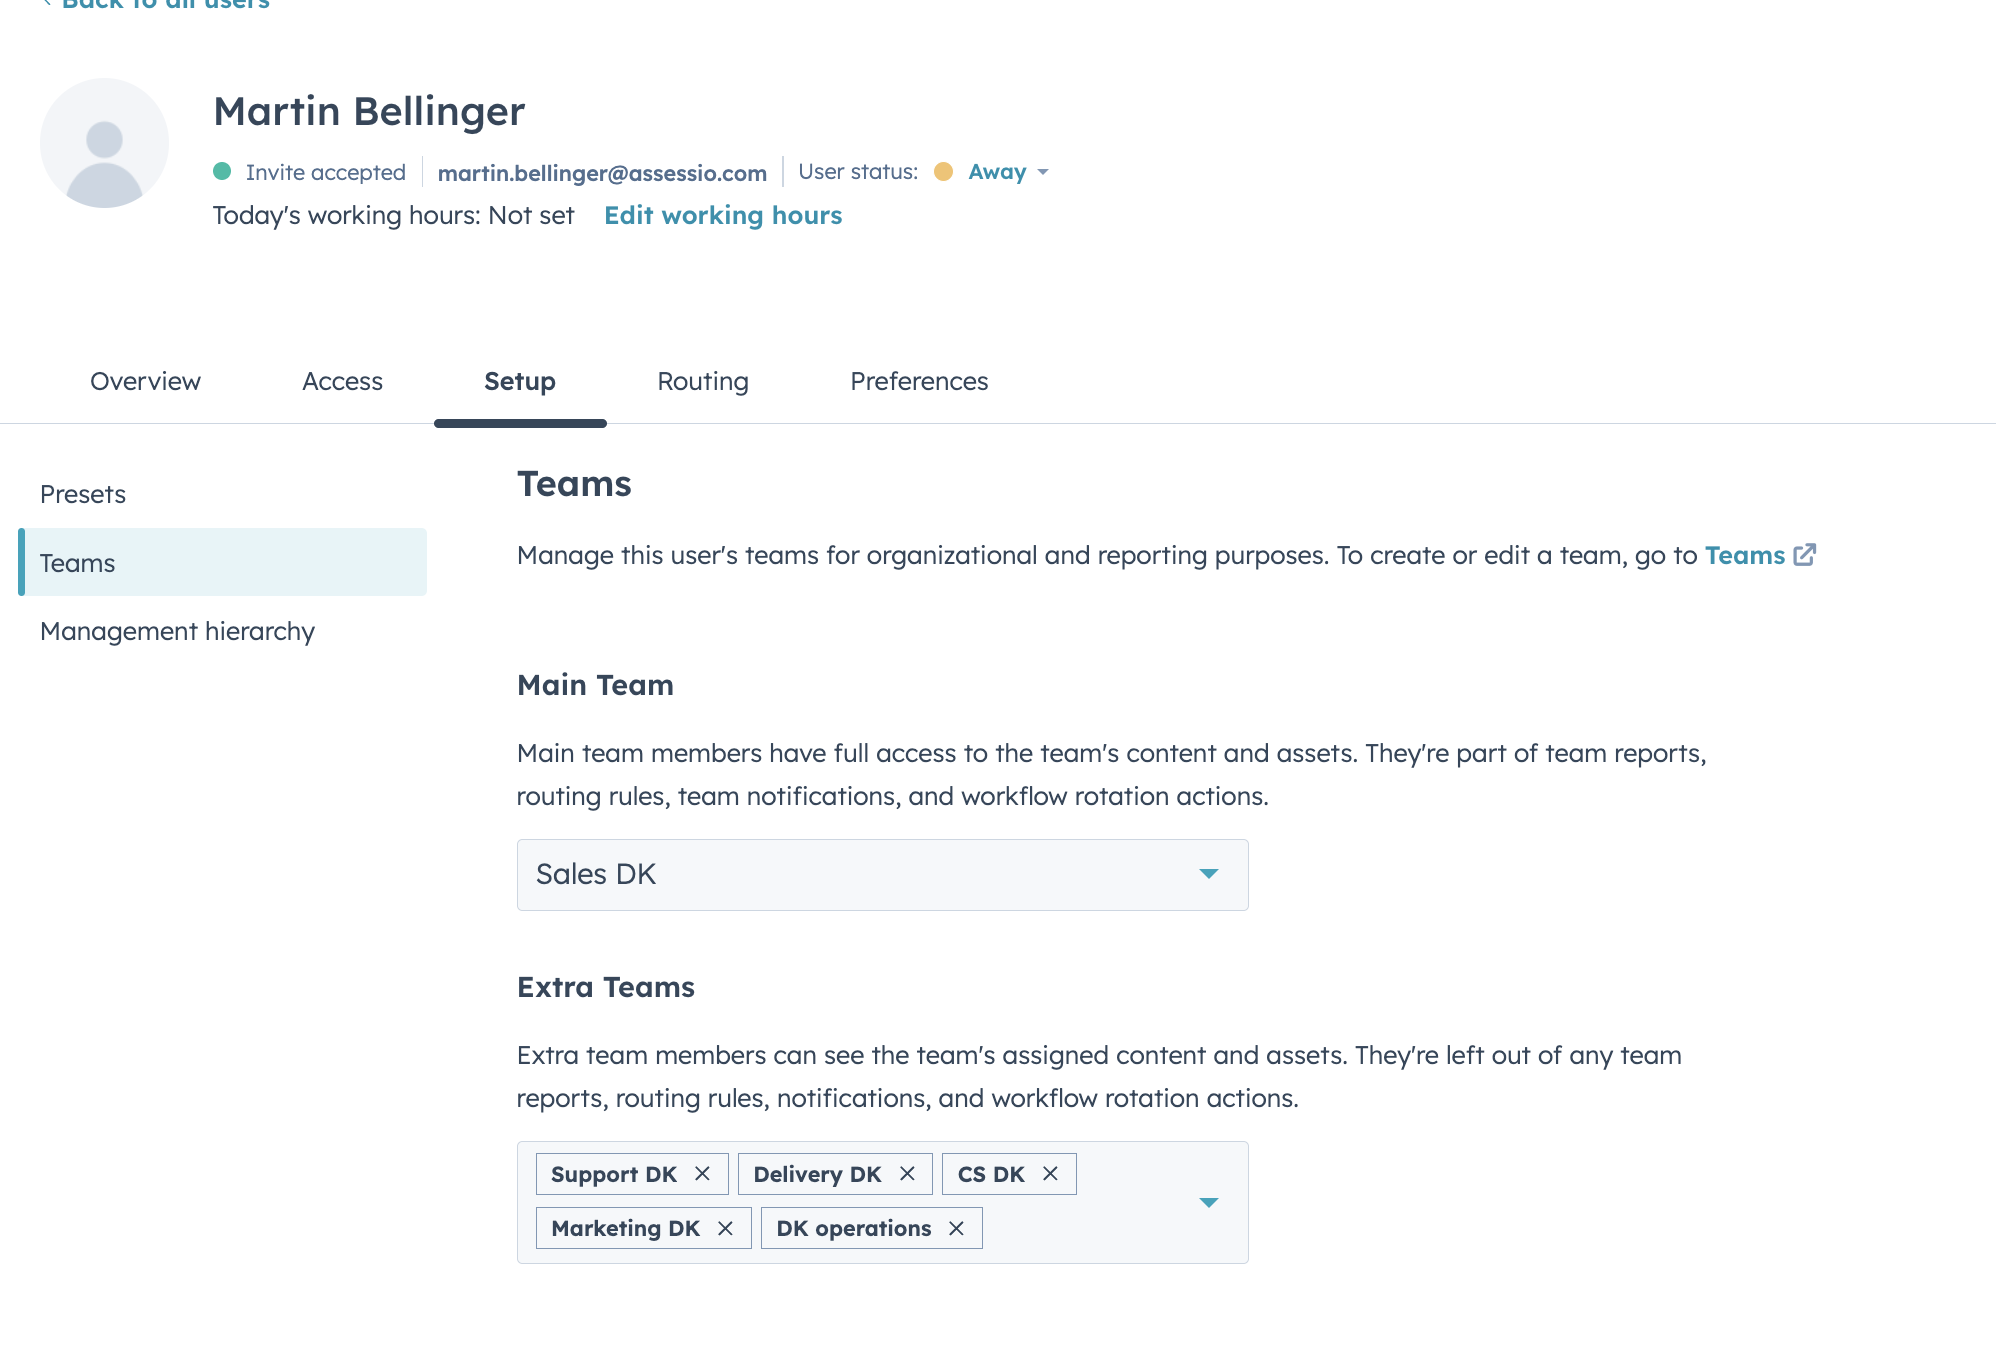
How to add new users in HubSpot
-
Click the wheel in the top right corner
-
Click users in teams on the left side menu
-
Click create user in the top right corner
-
Add the new user with email
-
Choose the right permission based on their role
-
Add the right team - please note if the person needs to see companies owned by multiple teams, they should be added here:
So Martin needs to see companies owned by CS, marketing and support from DK then we add him to those teams also
.png?width=670&height=455&name=image%20(35).png)
Quotation - How to handle new customer, upgrade, downgrade, non-recurring, migration in quotes
This section contains
-
New customer
-
Non-recurring
-
Upgrade/downgrade
-
Migrations
-
Conversions
See slides for all parts if the process here:
Full flow from HubSpot→Vlox→Zuora
New customer flow
See flow in slides here
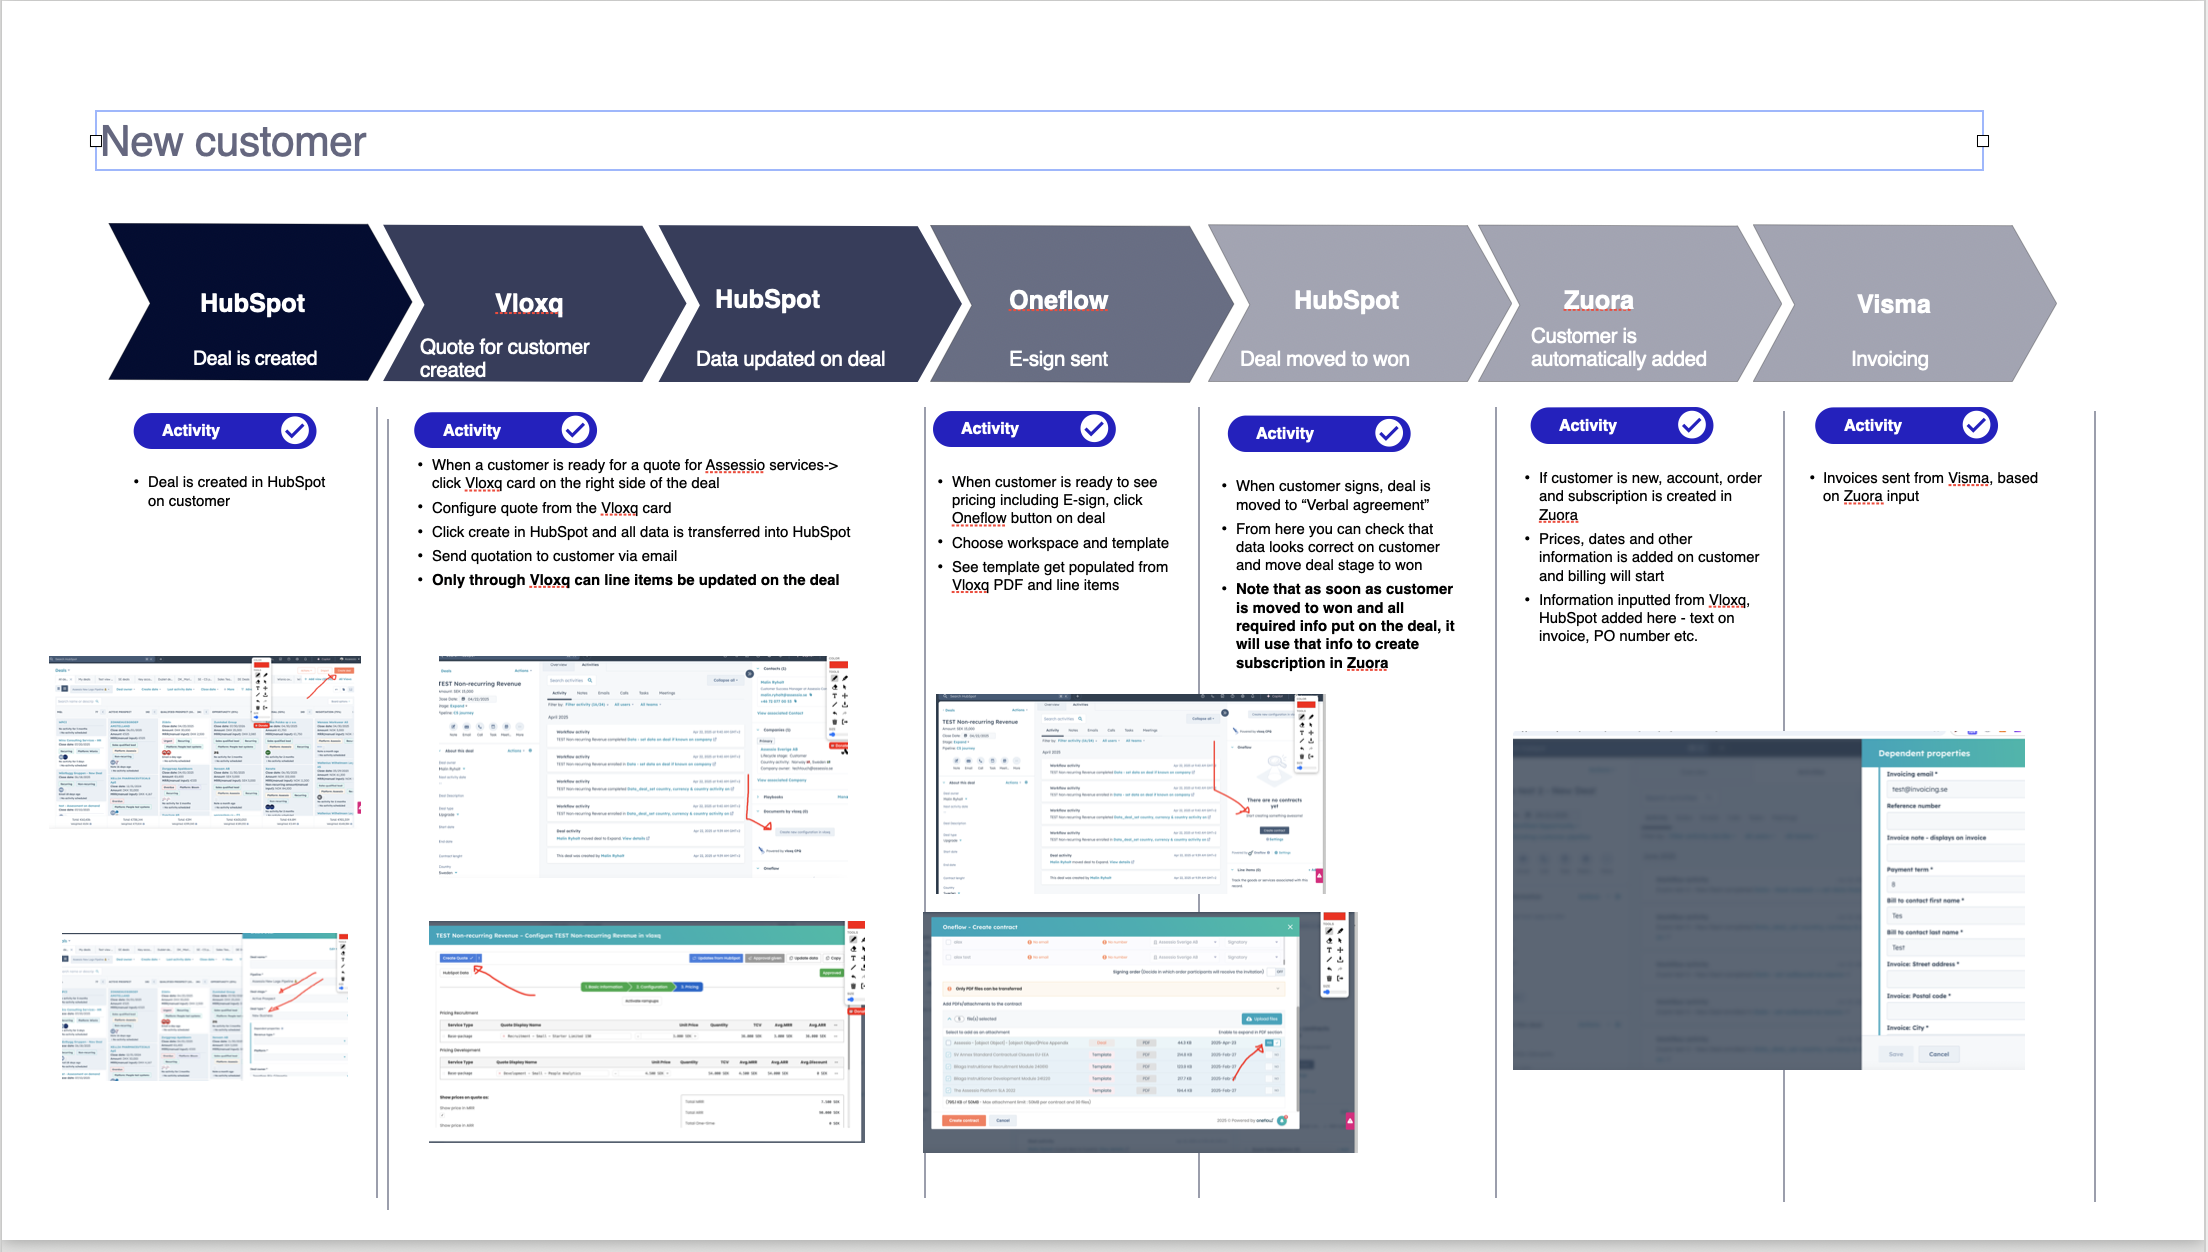
See video walkthrough of it all
Read step by step description here
1. Create deal in HubSpot
-
Create a deal for the customer.
2. Open the Vloxq card
-
When the customer is ready for a quote, click the Vloxq card on the right side of the deal.
-
Configure the quote, then click "Create" – this sends data back into HubSpot.
3. Send quote
-
Send the quotation to the customer by email.
-
Note: only Vloxq can update line items on the deal.
4. Trigger e-sign with Oneflow
-
Click the Oneflow button on the deal.
-
Choose workspace and template. Template is auto-filled with quote data from Vloxq.
5. Customer signs
-
Deal stage is moved to “Verbal agreement”.
-
Verify data and move deal to “Won”.
6. Automatic creation in Zuora
-
If the customer is new, account, order, and subscription are created in Zuora.
-
Information from HubSpot and Vloxq is used (PO number, invoice text, etc.).
7. Invoicing
-
Invoices are sent from Visma, based on Zuora input.
Non-recurring flow
See flow in slides here

.png?width=670&height=378&name=image%20(40).png)
See video walkthrough here
Assessio non recurring new flow
Read step by step description here
1. Create deal in HubSpot
-
Set revenue type = non-recurring (affects which products are available in Vloxq).
2. Configure quote in Vloxq
-
You can set:
-
Billing target date (when you want the customer to receive the invoice),
-
Start/end date for service, training, or certification.
-
-
Click "Create" → data is pushed to HubSpot.
3. Send quote & e-sign
-
Email quote to the customer.
-
Trigger e-sign by clicking Oneflow and selecting template.
4. Customer signs
-
Deal stage: “Verbal agreement” → verify → move to “Won”.
5. Zuora handling
-
If customer is new, a non-recurring charge is created in Zuora.
6. Invoicing
-
Invoice is sent via Visma, based on Zuora data.
Upgrade/downgrade
See flow in slides here
.png?width=670&height=378&name=image%20(41).png)
See short video here
Read step by step description here
1. Create deal
-
Use Existing Customer pipeline.
-
Set deal type to Upgrade/Downgrade.
2. Configure quote in Vloxq
-
Add current product, “Previous MRR”, and the new price.
-
Add new products if needed (these count as upgrades).
-
Vloxq auto-calculates the delta.
-
If using ramps, set pricing per interval.
3. Create & send
-
Click "Create" → quote data is pushed to HubSpot → email the quote.
4. E-sign
-
Use Oneflow to select template and send e-sign.
5. Customer signs
-
Deal stage becomes “Contract signed” → verify → move to “Won”.
6. Zuora update (manual)
-
Finance manually adds the subscription or charge in Zuora.
7. Invoicing
-
Visma sends invoice based on Zuora.
Migration
See slide of flow here
.png?width=670&height=376&name=image%20(42).png)
See short video here
Read step by step description here
1. Create deal
-
Use Migration pipeline.
-
Add migration-specific information.
2. Configure quote in Vloxq
-
Select the new subscription the customer is migrating to.
-
Click "Create" to push quote data to HubSpot and send the quote.
3. E-sign
-
Trigger e-sign with Oneflow → pick template and send.
4. Customer signs
-
Deal stage is moved to “Signed” → verify → move to “Won”.
-
Fill in migration-specific fields to help Finance process the subscription correctly.
5. Zuora update (manual)
-
Finance manually enters subscription or charge in Zuora.
6. Invoicing
-
Sent from Visma using data from Zuora.
Vloxq training 1 - showing the full flow
Video: https://t31517146.p.clickup-attachments.com/t31517146/2a3ec51f-12c7-4298-8ef7-e9cb0f0e802a/Training%20Vloxq%20-%20Mar%2031%202025.mp4?view=open
Vloxq quotation for new customer
Vloxq - new customer quote scenario
Vloxq quotation for an upgrade
Flow is the same as new customer - but instead choose the upgrade type on deal.
Note that as a interim solution finance is adding upgrades to Zuora manually - updated 2 of april 2025
Vloxq quotation for an downgrade
The downgrade scenario is the same as upgrade, only difference is you:
-
Pick the product that is downgrading in price or amount of tests etc.
-
Change the number of tests or downgrade price
-
Send new contract to customer VLOXQ FAQ
HubSpot word explanations - what does key HubSpot words mean?
-
Close date - the expected close date of a deal, until you have signed the deal, then this is the actual close date/signing date of the contract
-
Start date - The date of contract start overall
-
Target account - Each country has 5-6 target accounts that is choosen by the MD or sales manager
-
Lifecycle stage - which stage is the customer in? in Upsales this was called "journey"
-
Market/entity - Which part of the Assessio group is the customer "owned" by, a customer can still be owned by Assessio NL and still buy both Assessio platform and also Bloom
-
Amount - This is the total contract value of the deal which is ARR + Non-recurring revenue
HubSpot FAQ
Recorded trainings
CRM brushup training
In this training we walkted through the crm basics, contacts, companies, deals, and talked about pipeline, playbooks etc.
Video: https://t31517146.p.clickup-attachments.com/t31517146/5e62e9f9-9041-40d2-ab79-858d33cf847b/Hubspot%20brushup%20-%20Sales%20and%20CS%20-%20Mar%203%202025.mp4?view=open
SE sales training 2 - focus on basic crm, templates, sequences, sales workspace
Video: https://t31517146.p.clickup-attachments.com/t31517146/649128b1-049e-47b2-a9c0-45fd982324d6/SE%20sales%20CPQ%20%2BGo-live%20training%20X%20Sunrise%20-%20Mar%204%202025.mp4?view=open
Weekly sales training focus on Sales workspace, how to work with activities and logging
Video: https://t31517146.p.clickup-attachments.com/t31517146/71b3a4e9-dac6-4ce1-abaa-29e15a0b190f/Fw_%20Hubspot%20Weekly%20Sales%20Training%20-%20May%2015%202025.mp4?view=open
Weekly sales training focus on sequences and how to use it
Video: https://t31517146.p.clickup-attachments.com/t31517146/d6e14c32-3f62-421e-93cd-32a9e782c296/Hubspot%20Weekly%20Sales%20Training%20-%20May%2022%202025.mp4?view=open
Sales guides
Lead object creation & management & conversion to pipeline
Try for yourself here:
https://app-eu1.hubspot.com/prospecting/145462006/leads/view/open-leads?leadId=157637912557
Pipeline for new logos
https://app-eu1.hubspot.com/contacts/145462006/objects/0-3/views/all/board
Datastructure on companies
https://app-eu1.hubspot.com/contacts/145462006/record/0-2/16616264168
Datastructure on deals
https://app-eu1.hubspot.com/contacts/145462006/record/0-3/20926947815
Playbook for sales
https://app-eu1.hubspot.com/playbooks/145462006/compose/69974975
Templates & Sequences
See examples here
https://app-eu1.hubspot.com/sequences/145462006/?folder=272723143&page=1
Call & meeting types:

https://app-eu1.hubspot.com/settings/145462006/meetings
Forecasting
How to qualify a lead
Assessio - how to qualify a lead & handoff to a colleague
How to import Apollo data
How to configure an Oneflow template
How to work with the sales analytics dashboard for pipeline development
How to setup journey analytics